




|
|
|
|
|
|
|
|
|
|
|
|
|
|
|
|
|
|
|
|
|
|
|
|
|
|
|
|
|
|||||||||||||||||||||||
 |
    |
|
 |
 |
|
|||||||||||||||||||
 |
 |
|
||||||||||||||||||||||
 |
You've seen the rest, it's time for the best - BbBoy.net |
|
|
|||||||||||||||||||||
|
|
|
|||||||||||||||||||||||
 |
We truly are a feature-packed message board system. Click here to look at a few of the features we are proud to offer. |
 |
|
|||||||||||||||||||||
|
|
|
|||||||||||||||||||||||

A link with a ![]() will keep you in this document, those without it will take you elsewhere.
will keep you in this document, those without it will take you elsewhere.
The first thing you need to do is pick out the BID (Board ID) that will become part of your URL. Once you've done that, sign up for whatever plan you like and choose a catagory for your board to be listed under in our BbBoard Search. If you're logged in when you sign up you will be automatically logged in and made your boards first member. So when you get your welcome email from us you can go to your board and click on the Admin link, right beside the User CP
Here you can see the various catagories of the Admin Center of a free ad supported board and see the features which are grayed out. because they take a more bandwidth then ads could cover for all free boards. So if File Hosting, Posting by Email, Viewing the Full Log, BbGames and our fothcoming BbChat sound like features you'd like activated on your board you can Upgrade your existing free board with us to either a Fixed or Variable levels of service.
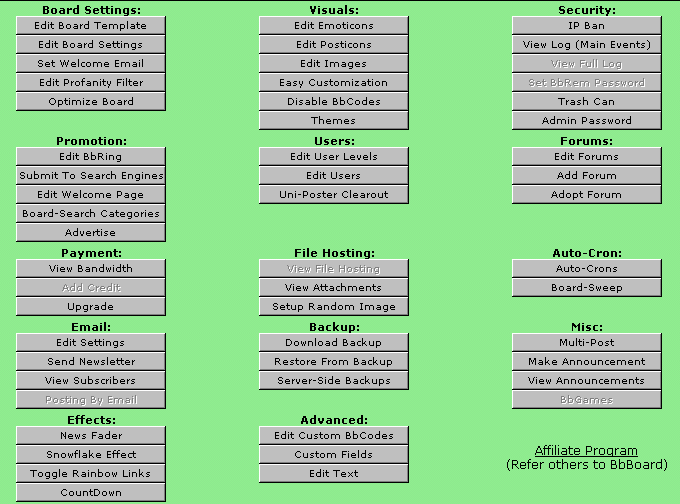
This How To document will focus mainly on setting up your Best Board as if it was the first time. Because most BbBoards created begin as free ones, we will go over those features we give all of our BbCommunities. We have a BbGallery that has 20 pages of BbHosted pictures for you and your members all to use on any BbBoard hosted with us. We encourage any of our BbAdmins to link to the BbGallery, the Lost Password link, as well as our BbSupport forums and BbBoard Manuals documents. You can always come to BbStaff for the answers to any questions or concerns you might have about using our service.
Once you've determined your desired BbBoard ID for your Best Board and have created it, you will be able to begin customizing it to suit your vision of what your BbBoard should be. The main Admin Center (See above graphic) has all kinds of options. You should name your BbBoard first, by going into the upper left Board Settings you will see a Edit Board Settings button. Click that and in there you will see many different options.
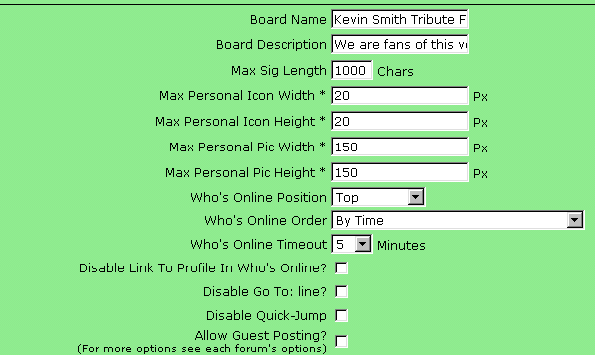
The name of the BbBoard can be changed here which will not affect your BbBoard's URL. You can add a short description of your board that other people will see to attract them to visit when your board is found in search results. You can set a maximum signature length here as well as the maximum Personal Pictures and Personal Icon sizes for your members. The Who's Online position, order, timeout time, disabling link to profile in, are all close to the top and then you have disabling the Go To line, Quick Jump and whether not to allow Guest Posting are all shown near the top in this Board Settings screen.
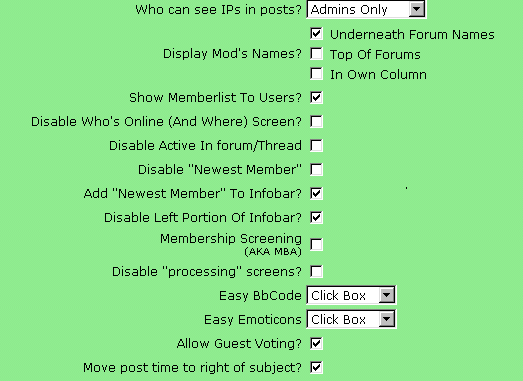
Further down the Board Settings Page you will see the settings for Who Can see IP#'s in Posts-Admins only, Admins and Mods, Everyone or None. You can choose whether to display mod's names Underneath, On Top Of or In Own Column. You can choose to show the Memberlist to Users or disable it and Disable Who's Online (And Where) Screen, along with disabling the Active in Forum/Thread and disabling the "Newest Member" feature if you would like to. There are checkboxes you can use to disable the Left Portion of the Info Bar, activate Membership Screening, disable the Processing Screens and have either click boxes or pull down selector menus for BbCodes and Emoticons in the Add Reply pages. The last two features you see in the graphic above are whether or not to Allow Guest Voting in polls and Moving the Post Time to the right of the subject.
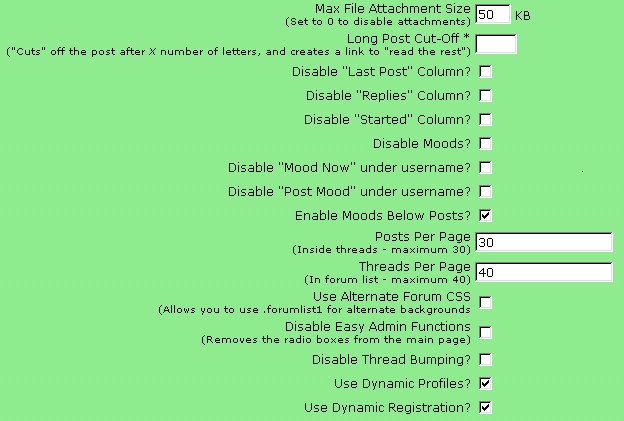
In this graphic above you can see the setting to set a maximum File Attachment setting, Long Post Cut-Off, Disabling Last Post, Replies and Started By column checkboxes. Also you enable or Disable BbMoods as well as setting up whether it goes under usernames or below posts. You'll set the number of Posts Per Page (maximum of 30) and Threads per Page (maximun of 40) here. You can check boxes here to Use Alternate Forum CSS, Disable the Easy Admin Functions, (Removes the radio buttons from the main page) Disabling Thread Bumping, Using Dynamic Profiles (insets profiles selected from anywhere on your board will appear in your Board Template-leaving this off defaults to our BbBoard Template) and Using Dynamic Registration.
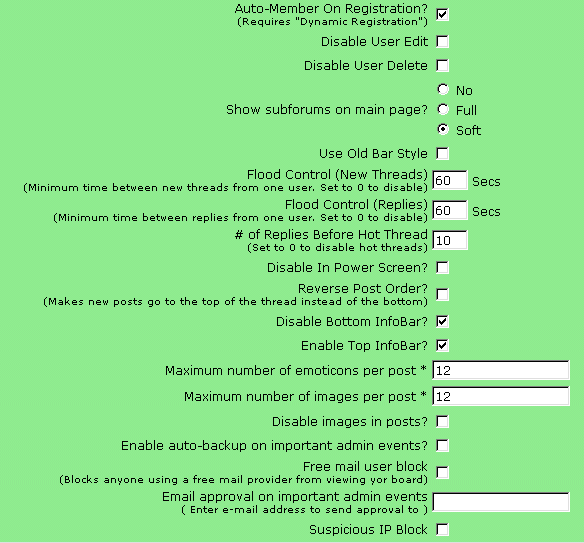
When you have Dynamic Registration enabled it allows the user to see the user sign up page inset into your board template. You can also check the box at the top of this graphic for Auto-Member On Registration feature, which makes anyone who registered off of your board's register link a member of your board regardless of whether or not they've posted. Here you can Disable User Delete and Disable User Editing. You can also choose what form of Subforums you will use. Soft is the most popular because it allows you to see the Subforum Names on the main board page and if it's in Italics that means there are new posts since your last visit. You can chose either to use or not to use the Old Bar Style with the checkbox here and also set the Flood Controls for Replies and New Threads. This is also where you set the number of Replies before a thread becomes a Hot Topic and choose whether or not to Disable the In Power screen which lists the board staff with positions they hold and an embedded email link-if the board's staff have their email address as public-if user has private email set in user settings it will only show a PM option. You can choose to use Reverse Post Order (newest posts at the top of threads) and if you'd like to disable the Bottom InfoBar along with having one or not having one on top of the forum table.
You can select in here the maximum number of emoticons and/or images along with completely disabling images in posts. You can enable the auto-backup on important admin events, block Free Email users from viewing your BbBoard and enter your email to have Email Approval on important admin events-please note that this requires you to receive HTML Emails or else you will have to forward it to another email account that can or you can switch the preference in your User CP from HTML Email to Text Email. The last option in the Board Settings screen is Suspicious IP Block. You can see there are a lot of things to consider about what level of control you want to start out with on your BbBoard. We give you inovative ways to maintain and run your message BbBoard. You can choose to use any of our fifty premade BbThemes to set your board's look with one click. If you have already set up custom Header and Footer you will want to save that HTML into a text document before installing a BbTheme because the BbThemes will overwrite the current template's Header and Footer to become the BbTheme's default.
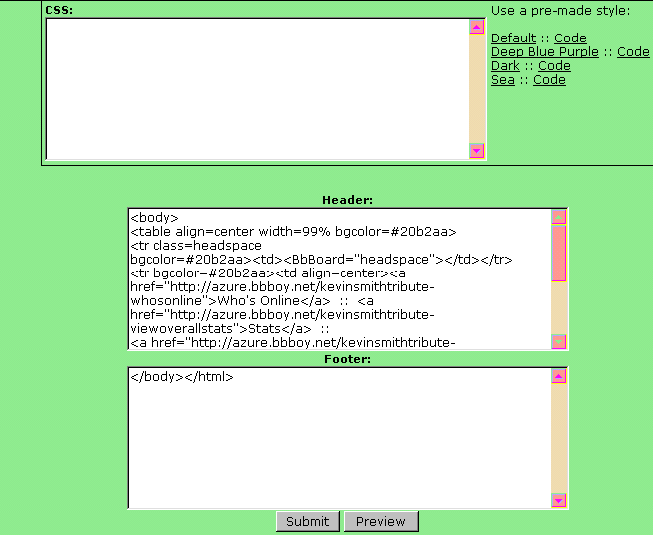
Once you've installed a theme you are free to change anything about its properties, including adding a Custom Header or Footer. You can add your own custom buttons in the Edit Board Images screen or change the font and color of table cells, amoung many other things using the Easy Customization screen. You can have Forum Specific BbThemes if you like as well as forum specific posticons, emoticons, custom fields and many other things.
Now that we've gone through the BbBoard Settings and talked briefly about BbThemes we next take a look at making our first forum. You can see that there is a lot to think about and experiement with in the BbBoard Admin center, to see what will do what you want to get the effects you're looking for. In the Admin Center under Forums heading are three options, you can click Add Forum and in the screen that comes up you can name and set up the new forum. Below is a image of a brand new BbBoard.
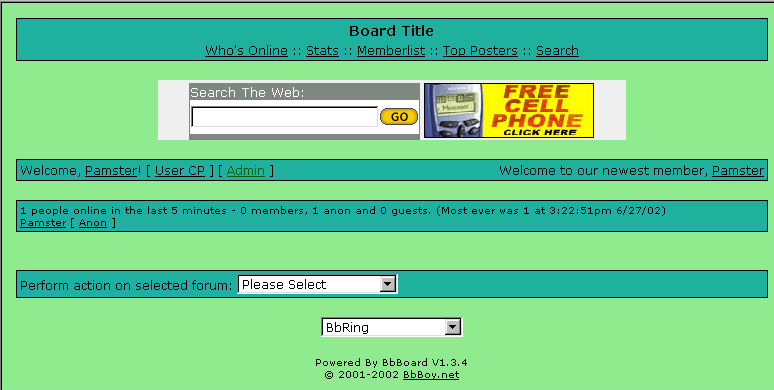
You can see that our boards come without a premade forum-you have to go through the forum creation process, name it and then to set up your first forum. When you make a forum you start creating the your BbBoard Forum Catagories and then create additional forums to set up your desired number of forums. There is no limit on how many forums and catagories you can have on your BbBoard, but one thing worth mentioning is that when you have a certain number of catagories and make a new forum meant to go higher up up the board to be in its proper board Catagory, you will need to Reorder your Forums.
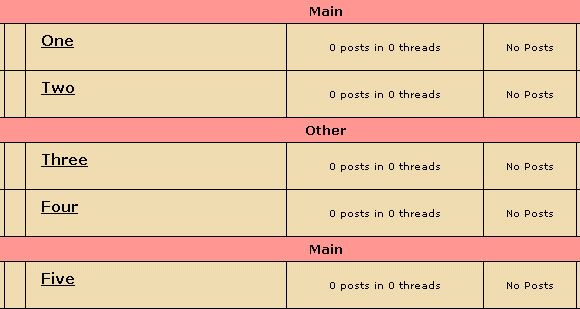
You can see above that it looks like you have two Main BbBoard Catagories, when in effect it is one, but needs re-ordered back into the proper Catagory on the board. Once it's underneath matching catagory headings the echo of a second Main catagory is gone. You can order your forums any way you desire, including adding Subforums. Subforums are useful for bigger BbBoards who have many forums and enjoy having them all in a parent forum which will make the main board page load faster since the sub forums using the soft type of subforums show new topics in them by being Italicized.
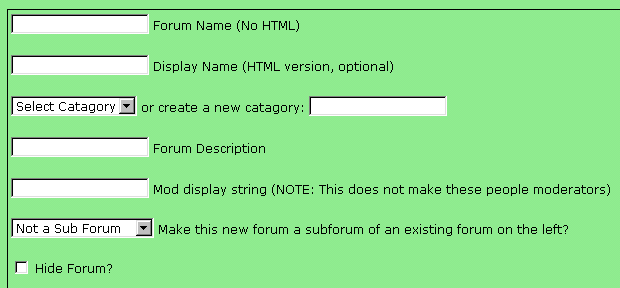
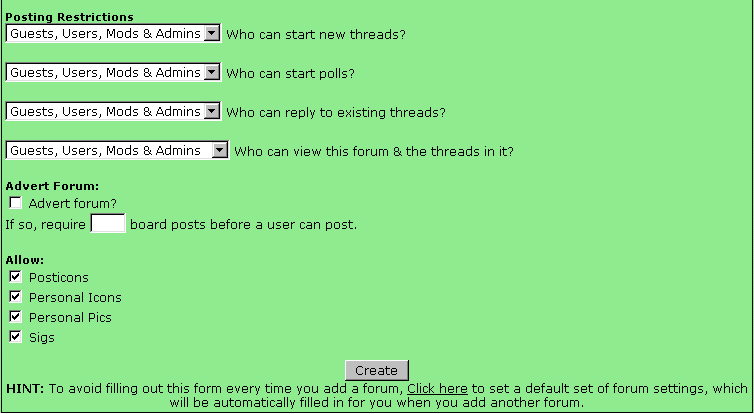
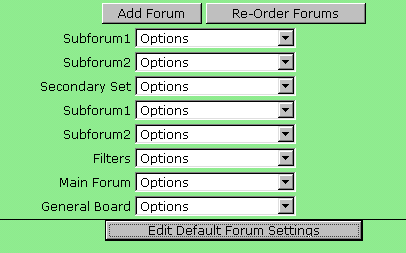
Let's move on to the actual forum settings. In the Edit Forums Screen you will see a series of pull down menus. And in each one are options similiar to those for the Board itself. This is so you can have forum specific items from forum specific posticons, emoticons and themes to button images and beyond. At the bottom of the Edit Forums screen you'll see a Edit Default Forum Settings which will allow you to set up a default for any future forums you add so that they will be set up matching the rest of your board in Posting Restrictions, display name and whether or not you want it to be a Advert Forum. Advert Forums are set up so that people can only post in them once they reach a predetermined amount of posts overall on the board. This is a very useful feature and can encourage people to continue posting so that they can gain access to the restricted forum. They can read but not post. Many boards have a links forum and that is what is meant by Advert Forum so that you can cut down on one time hit and run posters who only come to leave a link and not contribute to your board. Here are images from the edit forums screen.
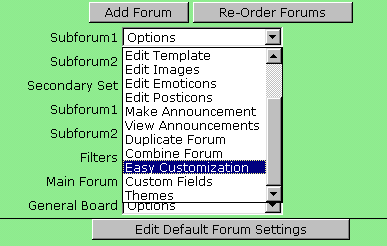
So now you should have a idea of how to create and set up your forums. You probably will want to set up User Levels that are unique to your community. This is done by the Edit User Levels button on the main Admin page. Here you can make as many different User Levels as you would like. You can use your own images using HTML to put the URL to the for your desired image into the space where the User Level Name is, repeating it as many times as you want it to display. Administrator and Moderator images have to be done manually, although you can use any of our images, but you have to input the HTML pointing to the images yourself. Here is a example of Administrator and Moderator lines of HTML code pointing to images.
Administrator<BR><IMG
SRC="http://bb.bbboy.net/ulimages/bbandit.gif"><IMG
SRC="http://bb.bbboy.net/ulimages/bbandit.gif"><IMG
SRC="http://bb.bbboy.net/ulimages/bbandit.gif"><IMG
SRC="http://bb.bbboy.net/ulimages/bbandit.gif"><IMG
SRC="http://bb.bbboy.net/ulimages/bbandit.gif"><IMG
SRC="http://bb.bbboy.net/ulimages/bbandit.gif"><IMG
SRC="http://bb.bbboy.net/ulimages/bbandit.gif"><IMG
SRC="http://bb.bbboy.net/ulimages/bbandit.gif"><IMG
SRC="http://bb.bbboy.net/ulimages/bbandit.gif"><IMG
SRC="http://bb.bbboy.net/ulimages/bbandit.gif">
Moderator<BR><IMG
SRC="http://bb.bbboy.net/ulimages/bbandit.gif"><IMG
SRC="http://bb.bbboy.net/ulimages/bbandit.gif"><IMG
SRC="http://bb.bbboy.net/ulimages/bbandit.gif"><IMG
SRC="http://bb.bbboy.net/ulimages/bbandit.gif"><IMG
SRC="http://bb.bbboy.net/ulimages/bbandit.gif"><IMG
SRC="http://bb.bbboy.net/ulimages/bbandit.gif"><IMG
SRC="http://bb.bbboy.net/ulimages/bbandit.gif"><IMG
SRC="http://bb.bbboy.net/ulimages/bbandit.gif">

All the code above will fit into the space where you see the Administrator & Moderator User Level name, even though it doesn't look like it will. If you are manually putting in HTML for other User Levels it goes in the same spot in the User Level name field. To just use our images for your User Levels you will see a button there for Images and cilcking on that will take you to a new screen where you can choose from some of our images.
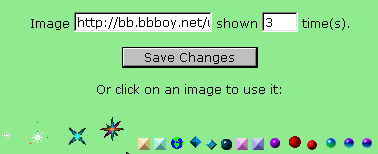
You just click on the image you want to use and put in how many time you want it displayed to set it up. The next time you load the User Level Screen you will see the User Level and its corrosponding images below the User Level name. User Levels are not the same as a Custom title and BbBoards allow you to use both a User Level and a Custom title at the same time. For entering a Custom Title you need to go to the main Admin page and select Edit Users. From there you check the boxes beside the users you wish to assign Custom Titles to and then go to the pull down menu and selelct Assign Custom Titles. Then enter whatever Custom title you desire into the fields beside the selected User's names and you can use HTML here as well.
There are some BbBoard Effects you can use that are easily turned on or off in the Admin Center. We have a option to make all your BbBoard links color cycle colors like a rainbow. There is a Snowflake effect you can use your own images to have a preset number of images cascading slowly down your BbBoard. A Newsfader to put at the top or bottom of your main BbBoard page, with fading lines of text that you put in the Newsfader screen in the Admin center. There is also a Countdown feature you can use that will display a countdown you can set up in the Admin Center right down to the minute a certain event will happen. You enter the text in the field describing the Event and that is what is displayed on the main BbBoard page, along with the days, hours and minutes until the event is to occur. See this picture below of the set up screen.

One thing we offer for all BbBoards is the ability to Back up your communities and even your User settings. There are two ways you can back up your BbBoard. You can download a copy onto your hard drive (If you do it's a good idea to keep a current copy and update your local copy frequently) or you can use the Server Side Backups where the Backup is stored on our servers and you can restore your entire BbBoard in just one click. Whatever route you choose to go, having this feature is something you can take full advantage of and use if you're about to work on something on your board, go in and make a server side back before you make any changes and if you do not like how it looks after playing around with it you can easily restore it yourself to its previous state.

Administrators and Moderators have the option of using HTML in posts by using the BbCode [HTML] and this is for security reasons. You can make your own Custom BbCodes to emulate HTML in many aspects without having the security risks allowing HTML in posts presents. If you do not like certain BbCodes you have the option of disabling them on your board. If you choose to do so you might want to use the select menu rather then the clickable one because it will show not only your custom BbCodes, but omit any you've chosen to disable.
You might find you want to add a custom field or two to your board, either board wide or forums specific ones. This is done by clicking on the Custom Fields button and choosing between Test Boxes, Radio Buttons, Check Boxes, Image URL, Image Selector or Yes/No fields. These have many kinds of uses so have fun with them and if you need help you can come to the BbSupport Board anytime and we can help you with them or anything else you might need assistance with.
One thing you might want to consider is our Advertising Program which now gives you the opportunity to get more members to your board, by purchasing banner impressions or popup views for your board. Click on the Advertise button in your admin center for more information, and to see our prices. All of the adverts you are purchasing would be shown on our network, so it's highly targeted. If somebody is seeing the advert, you know they are interested in message boards because they're already on one right now seeing your banner or pop up from our network. We have a lot of great things for our Fixed and Variable levels of service so if you are interested in upgrading, visit http://bb.bbboy.net/signup.shtml, choose your plan, and make payment as normal. After making payment, you will be asked for your board's details - check the "This Is An Upgrade" box, and put your URL into the "Board Name" box. We'll upgrade your board as soon as we recieve payment.
We hope that you found this How To Guide useful and hope that you enjoy using our service. If you have any suggestions on how we can serve you better please don't hesistate to post them in our Suggestions and Bug Reports forum.
~ Pamster