You've seen the rest, it's time for the best - BbBoy.net
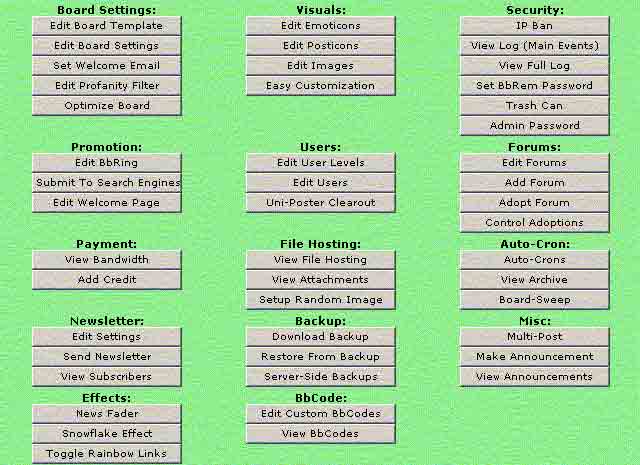
We truly are a feature-packed message board system. Click here to look at a few of the features we are proud to offer.

© 2002 BbBoy.net :: Written By BbBoy

Documentation :: User Tutorial :: Admin Tutorial :: Cruising Bb

Support Forums :: Sample Admin

Board Administration

Your Admin Center - First Glance

The Admin Center is where you control all of your board's look, feel, and behavior. Using the powerful options available at the click of a few buttons, you can make your board unique to you, and make it work exactly how you want it to. Please note that the screenshots shown here are low quality to help the page load faster. For a real view, see your own admin center.


This section will walk you through each of these buttons in turn, so you can understand exactly how to bring out the best in your message board. If you just want information on a specific button, choose from the links below.

Edit Board Template

This is where you can edit the HTML displayed with your board. If you know HTML, you can use this to make a sidebar, input CSS, or add a custom header and footer to your board. The board template screen has 3 areas.

  1. CSS


    The CSS box is for advanced users to tweak their board with the use of style sheet (CSS) code. This area is not recommended to control your entire board - look to Easy Customization for a very simple way of changing your board's style. There are a few CSS-only styles, but they are deprecated for the use of Easy Customization. You should most likely leave this box blank.

  2. Header & Footer


    The header & footer boxes allow you to input HTML to control the layout of your board. A common use is to add a side-bar table, or add links to your home page, guestbook, add a counter, etc.

    There is a special code available for use in these sections. It inserts the information for the current action, forum, and board. For example, at the top of the default style, you should see something like:


    To insert those generated links, use the HTML-like code wherever you want those links to appear:

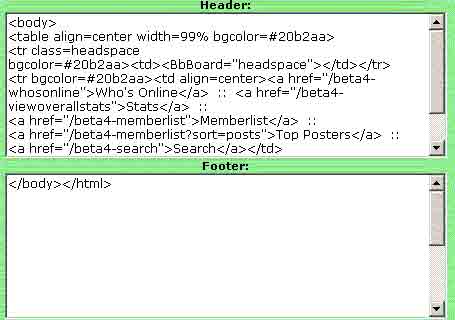
    <BbBoard="headspace">
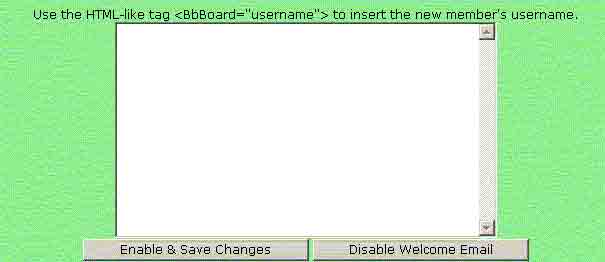
  3. Submit & Preview


    This part is simple enough - if you want to save your changes, click "Submit". To see a preview of the edited template before saving changes, click the "Preview" button. This will open a new window with the HTML/CSS you entered, being displayed so you can check if it looks alright.


You also have the option of using forum-specific templates. These are templates which will only be different in the forum that you specify. So, you can add a side-bar, logo image etc, to just a single forum without it affecting the whole of your board, if you wish. See the Edit Forums section for more information.

Edit Board Settings

This is the main settings screen that will control the basic options of your board. We'll go through the options a few at a time.


Set Welcome Email


The welcome e-mail is sent to new members when they make their first post on your board. You can use HTML. The e-mail uses your default board template, so everything in the template will be sent along with the e-mail. To insert the new user's username, you can use the:

<BbBoard="username">
code. That will insert the username wherever you put it. So, for example, this:

Hi <BbBoard="username">, welcome to my board!
will be sent as this, if the new user is "Bob":

Hi Bob, welcome to my board!

Edit Profanity Filter


The profanity filter is a good way to prevent your users from using unsuitable language in their posts, without moderators having to edit every unsuitable post.

Current profanity entries are listed on the top. To delete an entry, just click the "Delete" button to the right of it.

To add a new entry, enter the word to censor in the left box ("from"), and the word to change it to in the right box ("to"). you can use an alternative word, or just blank it out with *'s if you wish. Click the "Submit" button to save changes.

Optimize Board

Clicking the "Optimize Board" button removes temporary database entries, cleans up a bit, and generally makes sure that your board is running as fast as it can be. It's recommended to optimize your board at least once a month.

Edit Emoticons


This screen is where you can add, edit, and delete custom emoticons.

There are some widely-used smileys which are automatically converted to their full emoticon names. Here's the list:

Key ComboEmoticon
:) or :-):smile:
;) or ;-):wink:
:D or :-D:biggrin:
:( or :-(:sad:
:p or :-p or :b or :-b:tongue:
:/ or :-/ or :\ or :-\:ohwell:


So, to change the emoticon for :) for example, simply create an emoticon with the name "smile". You can also have forum-specific emoticons that will only be available in a single forum if you wish. See the Edit Forums section for more information.

Edit Posticons


This screen lets you delete, and add new posticons. Posticons are images that are displayed to the left of threads to give a general feeling about the thread, by the person who started it.

You can also make use of forum-specific posticons. See the Edit Forums section for more information.

Edit Images


The "Edit Images" screen allows you to enter the URLs to 16 images used on your board. All (except the "New" image) will be text links if you don't enter an URL to an image.

All of these image can be set forum-specifically, so that they are different in each forum, if you wish. See Edit Forums for more information.

Easy Customization (EC)


Easy Customization is the easiest way to change the colors, fonts, and general look of your message board.

The following are the same for the [whisper], [quote], [code], [spoiler], and [action] tags. You can customize each one seperatly - there's the following 4 boxes for each: There's 2 more sections of customization in the EC screen: The remaining section allows you to change the various colors of the scrollbar.

At the very bottom of the EC screen, there's options on what saving these settings will do. If you have some custom CSS in the CSS field, then you'll want to check the "Don't clobber current CSS" box. If you don't check it, it will automatically delete the CSS, as it's un-needed. Underneath that box, there are checkboxes for each forum, and "Whole Board". You can either apply the EC settings to your entire board, or just to the specific forum(s) that you wish to. click "Submit" to save changes.

IP Ban


The IP ban screen allows you to restrict people from certain IP numbers from viewing your board.

View Log (Main events)

This will download a log to your hard drive of the major events that have happened in the history of your board. This includes such things as adding/deleting forums, deleting threads, and any major admin event. It lists IP number, username, time, and action.

View Full Log

This will download a full log to your hard drive, of pretty much all events that have ever happened on your board. This includes users viewing a forum, posting a thread, etc. This option is not available on the Free plan, as it can take up quite a bit of bandwidth if you have a large log.

Set BbRem Password

This option is only available on Variable plan boards, as that's the only plan BbRemote is used on. BbRemote is a script which you host on your own server, which relays all requests to your board with us. This way, it's harder to tell that we're hosting the board, and it appears to be a script on your own server. Which it is, it just relays the requests to us. On the BbRem password screen, you can just enter the password to use, and make sure it's the same in the configuration for the script. See the readme file in the BbRem zip file for more information.

Trash Can


The trash can holds threads which have been deleted on your board. It stores them for 3-10 days before they are really deleted. The idea is that you can restore them if it was a mistaken delete, or a disgruntled moderator who shouldn't have deleted the thread(s).

Admin Password


The Admin Password is a special password which you can put on all important admin events. If you do, administrators will need to know the admin password to do major admin events.

Edit BbRing


The BbRing allows you to swap links with other boards, by putting them in the BbRing on the bottom of your board.


To re-order the BbRing, simply click on a board to re-position in the box, and choose "Down" or "Up" to move it. When you're happy with the order, click "Save Changes". If you've never re-ordered them, they'll appear in a random order.

Submit To search Engines

Clicking the "Submit To Search engines" button will submit your board to some major search engines, all at once.

Edit Welcome Page

The Welcome Page is a page which you can display your board rules, introduction etc on, without having to find an web host just for the one page. Clicking on the "Edit Welcome Page" button will give you a text area where you can input HTML for your welcome page. When you've input the HTML, click the "Save" button to save it. Then, you can link to http://bb.bbboy.net/YourBoardID-welcome for people to view it.

Edit User Levels


User levels are text/images that are displayed under users' names when they reach a certain number of posts. You can use HTML in user levels.

Edit Users


The "Edit Users" screen is the main ares to control/edit your users. To manipulate a user, put a check in the box next to his/her name, and then choose one of these options from the pull-down menu at the bottom:

Uni-Poster Clearout

This feature lets you easily delete users who have only ever posted once on your board, and never came back, all in one go. Clicking the "Uni-Poster Clearout" button will bring up a confirmation screen, which lists all the users who will be deleted, should you confirm.

Edit Forums


This is the main area where you can make changes to your forums. After clicking the "Edit Forums" screen, you are presented with a list of all your existing forums, with a select box to the right of each one. Choose an option from the select box to the right of the forum you wish to change. Here's the options:


On the "Edit Forums" screen, there is also a button "Re-Order Forums". To move a forum up, select it's name in the menu, and click the "Up" button. To move it down, click the "Down" button. When you're happy with the positioning, click "Save Changes".

Add Forum

This is where you can add a new forum to your board. See Edit Forums for information on the boxes available here.

Adopt Forum


This option lets you adopt a forum from another board. Adopting a forum means to display a forum from another board onto your main page, to blend in with your own forums. This is a good way for people to be able to "share" a certain forum with their friends' boards too, for example an RPG forum could be listed on multiple boards to gain maximum interest.

To adopt a forum from another board, enter the BoardID (The part after http://bb.bbboy.net/ in the board's URL) in the box. Then, enter the forum number for the forum you wish to adopt. The easiest way to find out the forum number is to visit the board that the forum is on, and hover your mouse over the link to view the forum. In your status bar, you should see something like:

http://bb.bbboy.net/support-viewforum?forum=10
The forum number is the part after "forum=", in this case, 10. You can also enter an optional message to the admin at the board that they see when approving your adoption request.

When you click "Submit", the admin(s) of the board in question are sent an e-mail with instructions on how to approve (or reject) your adoption request. Once they approve it, the forum will appear on your main board page. See Control Adoptions for information on how to manipulate adopted forums on your board.

Control Adoptions


This is the area where you can control any forums which you have adopted.

View Bandwidth


Clicking this button reveals different things depending on which plan you're on. People on the free plan will only see how much bandwidth their board has used. People on the other plans will see a breakdown of bandwidth, and cost deduction from the total credit given. There's not much to do here except look.

Add Credit

If you're on the fixed or variable plans, clicking this button will let you know how to add more credit to your board.

View File Hosting


Boards on the fixed and variable plans have the "File Hosting" feature available, where you can upload files, and use them from your board's space. You are assigned 1MB of space for file hosting.

View Attachments

Clicking "View Attachments" will give you a list of attachments on your board, and show how much space you have left. You are given 1MB of space for attachments (which is a different 1MB than that given for File Hosting). There's not much to do here, except look.

Setup Random Image

The random image feature allows you to display a random image every time it's loaded. After clicking "Setup Random Image", you get a text box to enter the URLs to images. Enter one per line, like:
http://domain.com/image1.gif
http://domain.com/image2.gif
http://domain.com/image3.gif
The image that you can use to call the random image is listed above the text box.

Auto-Crons


The auto-crons screen lets you set what happens to old threads when there's more than a certain number in a forum. You can choose from: Enter the number of threads (if applicable) in the box on the right, and save changes.

View Archive

This will take you to the archive forum that old posts are moved to, if you're using the auto-archive auto-cron. This forum is only viewable by admins, but you have the full range of options - including moving threads back out into the open.

Board-Sweep


The Board-Sweep feature will let you search through all posts in all forums, and replace one string of text with another. This is handy for example if you change web hosts, and need to change one URL to another so past images show up.

Enter the text to change in the left-hand box, and the text to change it to in the right-hand box.

Newsletter Settings

Entering the newsletter settings allows you to set up a newsletter for your board. Click the "Save Changes" button, and your newsletter will be active.

Send Newsletter

If you have your newsletter enabled, this is where you can send an e-mail to all of it's subscribers. Just type your e-mail in the text box, and click "Send Newsletter".

View Subscribers

If you have your newsletter enabled, clicking this button will let you view, and un-subscribe, any of the current subscribers to your newsletter.

Download Backup

Click this button to download a backup of your entire board to your hard drive. You can restore this downloaded backup at any time, by re-uploading it. Please note that if you have a large board, this backup file will be pretty big. It contains all of your forums, threads, settings, templates, logs, etc.

Restore From Backup

Click this button, and you are presented with a confirmation screen, allowing you to upload a downloaded backup file. Click the "Browse" button to select the backup file from your hard drive, then click "Restore" to upload it, and restore your board.

Server-Side Backups


Server-side backups are backups that are stored on the server rather than ones you download. You can have up to 10 server-side backups at any one time. Backups contains all forums, threads, settings, templates, logs, etc. If you only want a partial backup (just one forum or something), please e-mail support@bbboy.net.

Multi-Post

Clicking this button will bring you to a regular "New Thread" page. But, at the bottom, there are checkboxes for each forum on your board. Put a check in the box for each forum you wish to post to. This is useful if you're making an announcement, or a general post which needs to go in more than one forum.

There are also 2 more checkboxes in the "Options" section. Check the "Lock Thread?" box to automatically lock (close) the thread when it's posted in the forums. And/or check the "Pin Thread?" box to automatically pin (stick) the thread in the forums you specify.

Make Announcement


Clicking the "Make Announcement" button will let you make an annoucenemt to the current members of your board. Type the announcement you wish to make in the textarea, and choose one of the types:

View Announcements

Clicking this button will allow you to view all current running announcements, who has yet to view them (if a popup announcement), and allow you to delete them if you so wish.

News Fader

Clicking this button will allow you to set up a news fader on your board. You'll be presented with these options:

Snowflake Effect

Click this button to set up a snowflake effect on your board. You'll receive these options: Hit "Save Changes", and your snowflake effect will be active.

Toggle Rainbow Links

If rainbow links are not currently enabled, this will enable them. If they are enabled, it will disable them. Rainbow links makes links on your board turn all different colors when the mouse hovers over them.

Edit Custom BbCodes


This screens allows you to create your own custom BbCodes. Enter the Bbcode that you wish to create in the left hand box, and the HTML to convert it to in the right. For example, with this in the left box:
marquee
And this in the right:
<marquee>
You (and your users) would be able to use [marquee] in their posts to get the <marquee> tag. Note that if your HTML requries a closing tag (</marquee>), you'll need to create a seperate BbCode for it, like [/marquee] .

View BbCodes

This screen will allow you to disable certain BbCodes. Click the "Disable" link to the right of the code to disable it.

~ BbBoy

Return To Top | Documentation